I shipped my three year old off for a sleepover at Pepaw's and finally got to tackle a project I've been dying to do- DIY chalk paint (not to be confused with chalkboard paint, mind you). Chalk paint has been pretty trendy in the up-cycling furniture world for a while now, but with expensive brands, like Annie Sloan, I've yet to try it.
It all started when I popped in an adorable, re-used furniture store in Sewickley, called Ideas, before Christmas. The owner was so sweet and gave me a sample of the brand she carries in her store. It's called Maison Blanche and it's an entire line of paint/waxes. I chose a bright green and I finally got around to painting a little stool from my bedroom. Chalk paint boasts of being easy with little-to-no prep work involved. Just paint and wax and you're supposedly done. It probably took me about four coats till I had complete coverage. Had I been going for the farm/distressed look I could have knocked it out in one coat, but I wanted a solid look. Here's the process:
I really enjoyed not having to sand or prime my stool, and I even tested its durability by scratching my nail across it (barely scratched if you must know). My only hang up is the price. Now it's not so bad if you're only doing a small stool to pay $10 a jar. I even have half a jar left! But if you're going for a whole dresser and want it completely painted, not just the distressed look, that's going to put a hole in your pocket. So I did some digging and found out it's really quite easy and affordable to make your own paint!
There are multiple ways of doing it, but I chose to buy some calcium carbonate powder from a drug store online. It cost me all of $3.85 with free shipping. Deal.
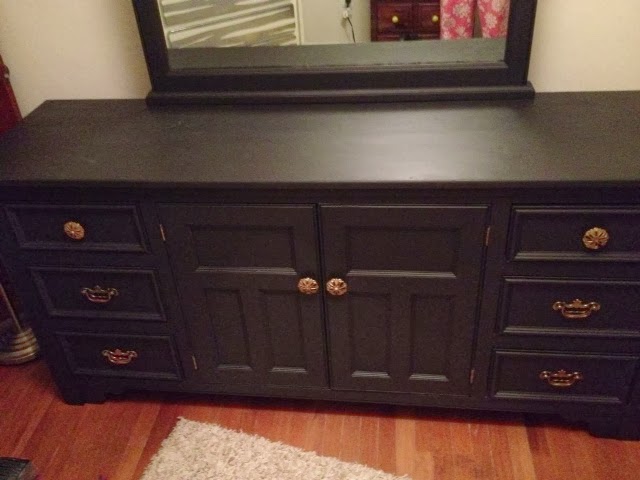
I had a request to do this dresser in a black-matted paint which was perfect for this type of project.
It all started when I popped in an adorable, re-used furniture store in Sewickley, called Ideas, before Christmas. The owner was so sweet and gave me a sample of the brand she carries in her store. It's called Maison Blanche and it's an entire line of paint/waxes. I chose a bright green and I finally got around to painting a little stool from my bedroom. Chalk paint boasts of being easy with little-to-no prep work involved. Just paint and wax and you're supposedly done. It probably took me about four coats till I had complete coverage. Had I been going for the farm/distressed look I could have knocked it out in one coat, but I wanted a solid look. Here's the process:
Observe ugly stool.
First coat (I always use a fairly dry brush when applying my first coat).
Second coat.
Third
And finally a forth coat and some new fabric.
Now if I only I knew where I put my staple gun.
There are multiple ways of doing it, but I chose to buy some calcium carbonate powder from a drug store online. It cost me all of $3.85 with free shipping. Deal.
I had a request to do this dresser in a black-matted paint which was perfect for this type of project.
Even though you're not supposed to have to sand, I still used a Brillo-wool pad and lightly went over my dresser top to bottom. I did this all in our spare bedroom just making sure to vacuum and dust afterwards. Next, I pour some of my black latex paint (it happened to be an eggshell finish) into a spare can about a fourth of the way. Then I poured about a third of a cup of the calcium carbonate powder in and stirred it really well. I've read different measurements like 1/3 powder to 2/3 paint if that helps you. I'm not a measurer, hence I'm a horrible baker. But it's never been a problem with painting. I just feel for a thicker consistency when stirring, and make sure you stir well, otherwise you'll get little, white beads of powder when you're painting. I dry-brushed my first coat on making sure it was pretty thin. When dry-brushing the key is to only dip about a millimeter of your brush into the paint. Time efficient, no, but it dries quick and allows for a really nice, even second coat. I haven't tried a roller with this paint yet, and I almost feel like it's too thick to try. You really don't see the brush strokes with the chalk paint, so I kind of like using the brush. I did about three coats with this batch of paint I made and still had some left over. I've yet to wax it, but I'll get to that in another day or so. All in all, I'm more than thrilled with the result. I feel like I accomplished the same effect for half the price. That gets a check in my book any day.
The finished product. Doesn't even look like the same dresser, does it?
.JPG)
.JPG)
.JPG)
.JPG)
.JPG)


No comments:
Post a Comment