Tuesday, December 24, 2013

Merry Merry Christmas {2013}

Wishing you all a Merry Christmas and Happy Holiday season. It's come so quickly this year (as it always does). My husband turned to me in the car as we were driving home the other day and said, "I really feel like we've embraced the holiday spirit this year!"
Aside from the two trips to Med Express for my daughter's cold-turned-eye-infection (after all, it wouldn't be Christmas if someone wasn't sick) it's been an amazing Christmas with lots of family and fun holiday parties. I hope yours has been great, too.

Saturday, December 14, 2013

Bonjour, un cafe s'il vous plait.


This makes me smile. And has nothing to do with design, but I thought I'd share anyways. A cafe in France charges extra for rudeness! Shouldn't everything in life be like this?

Also, while were speaking French... I give you the new and improved French Provincial Vanity. Sorry for the ugly garage shots. It's too cold to bring it outside for some prettier pictures.
The top and the middle opening have been painted a beautiful, Tiffany blue. 


The drawers are lined with some retro contact paper.

And the base has been sanded to its natural wood.
The vanity is listed for sale on the bedroom tab for $140, but I'll take 10 % off if you say "Bonjour, un vanite, s'il vous plait"! :)

Monday, December 9, 2013

Inexpensive MCM Bucket Chair Review

 People tend to think I'm anti-ikea or anywhere else that has cheap furniture because I'm into finding vintage, quality furniture. That's only partially true. I wouldn't want my entire house to be ikea, just like I wouldn't want everything in my house to be from one era, rather everything in moderation.
I've found Overstock to be pretty great when you're in a decorating pinch. I've been wanting two extra chairs in my dining room for a while, and it's just so hard to find a matching pair in good shape at any given thrift/consignment store that isn't going to cost you an arm and a leg. I've purchased a couple other items on overstock, and when I saw these chairs on their cyber Monday sale, I had to have them. I actually got them at about 40% off the price they are now.
I've ordered a coffee table from them before and it arrived damaged (they sent me a new top at no extra charge immediately), so I was curious to see how these chairs would hold up. They shipped in less than a week, and I finally had time to put them together today (ie. screw in 4 screws). They're shorter than I expected-guess I should have looked at the measurements-but otherwise pretty awesome. I love how light they are so I can just move them around where extra seating is needed, and they're fairly comfortable for being a plastic chair!
They're broken down and shipped in this box! 
Here's the base

And the chair. 

Assembled in less than 2 minutes! 

Here they are in my dining room,
although I might put them in my living room after Christmas.
We'll see. 

Wednesday, December 4, 2013

Christmas Bulbs Hanging From The Chandelier

Hooray! Christmas is here. I went easy on the Christmas decor this year since my house is STILL on the market (ugh). And by easy, I mean I didn't display my Santa collection. The chili pepper lights have been strung on the mantle, the trees are up (we have one real & one fake), and this year I tried something new: hanging glass bulbs from the chandelier.
My inspiration was from a holiday display in Anthropologie. That store was made for Christmas! They had a bunch of bulbs hanging from white string. Simple. I can do that. So I did. Except I used my chandelier as a base.


I bought my glass bulbs from Restoration Hardware six years ago for a similar project. Here's a throw back pic of me and my then-boyfriend-now-husband, Tony. Can't believe this was six Christmases ago! 

 My project didn't go quite as planned, but I got a husband out of the deal so I guess all was not lost. These are similar bulbs here, but I waited till the end of the season when they went on deep discount. I've used them every year since.
This year we got the most beautiful tree at Lowes (a Scottish fir, I think & only $17.99 for a 6 footer!) and I reused the free string they give you to tie the tree to your car. I simply tied the string to the bulbs and to the arms of the chandelier at alternating lengths. No real rhyme or reason...I just used my eyeballs to eye it up.

 This was seriously one of the easiest projects I've ever done and the end result is really fun. I'm sure it'd look great with some more festive colored bulbs, too. I'm just a sucker for whites and blues (and pinks) during Christmas.
 p.s. I don't know if you've noticed, but I added "Buy Now" buttons to all my furniture for sale. That way you can purchase anything online through Paypal. Also, as an added bonus for this week alone (good through Dec. 9) everything is 45% off! And I'm offering $35 local delivery (just email me if interested in delivery). Merry Christmas and Happy Holidays to all! 


Sunday, December 1, 2013

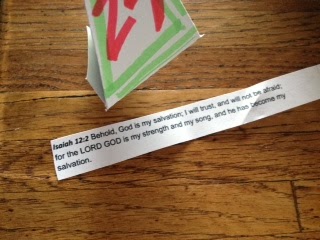
Happy 1st Day Of Advent: DIY Advent Tree Project

This year I tried a simple DIY Advent project made from card stock, markers, and tape (all things I had laying around the house). 
I found this tutorial for the trees here
 and I printed out verses I found from this other tutorial here.
Here's ours lined up along the window seal.
Taliila literally only colored one before she got bored. 
But for the average child I'd say this would be a fun project.


 I think green card stock would have been a nice choice for the trees, but I only had white and didn't feel like running out to the store. Plus, I started it yesterday, and since today was the first day of advent, I didn't have much time to get it done. If you have little ones, white is fun because they can use markers to decorate the trees.
First you just print out the tree template from this site on card stock.
Once colored, I cut them out. 

I folded along the lines and used tape (no glue) to close them.
Then I folded up my verse and put a little piece of candy in the bottom of them. I did this step without Taliila seeing it, lest she want the candy right away... you try teaching a two yr old delayed gratification. 


After church today I told her to find the tree with the number 1 on it. She found it and took it to dadad to help her open it. We read the verse and she happily ate her piece of candy. She tried to get us to open another tree, of course, but she'll get the hang of it soon enough.


Friday, November 29, 2013

Thanksgiving Shenanigans.

Did you have a good Thanksgiving? I somehow lucked out this year and only had to make the green bean casserole. We had one meal around noon with my father-in-law who prepared a turkey, ham, mashed potatoes, corn, stuffing, and two pies! My husband also made ribs. Can you believe that? Then around five o'clock we headed out to Saxonburg, where my husband's step-grandparents live and ate all over again. My mother-in-law made moonshine, which my friend from South Carolina told me is all the rage down south. It was delish! To go with the southern vibe we had some fiddle action. Here's a video of my daughter "playing" her new violin her uncle gave her (Warning: you have to put up with my singing voice- this is no easy task). But Taliila's really into violins for some reason. Any tips on good local music teachers?


So fun and such a great, no stress day. I'm very thankful. Black Friday was a whole different story. I went to two stores, one with a sleeping toddler, and the other with a screaming toddler. Not so fun. Black Friday is so overrated. At least with a two year old. Now onto decorating for Christmas...

Monday, November 25, 2013

Simple DIY Holiday Gift Ideas: Day 2

Custom Framed Art
My husband is an eBay guru. He found this sick Wreck-It Ralph print and happened to nail it for $75 (inc. shipping). This happens to be my {almost} 3 yr. old's favorite movie. We were going to frame it and give it to her for Christmas, but we couldn't wait. Especially since we weren't sure it was actually present-worthy for a 2 1/2 yr old. I'm happy to say we were wrong. This little girl LOVES her "Ref it Ralph pwsent". She even asked me to take a picture of her standing next to it. Thus, the next four pictures I'm showing you. I bought the frame from IKEA for $24.99 (a steal) although I'd been staking out thrift shops for a used poster-sized frame, but just couldn't find the right size. I'm sure I'll find one next time now that I've already bought this one. 
You can find the print here or find out more about artist Tom Whalen here


This is the face she gave me when I told her to smile. :)

So even though this isn't completely a DIY project, I think it's super special to buy original art from artists and frame them for your loved ones. Here are some awesome little prints from a shop called French Prints on etsy that I think are extremely giftable. Wouldn't they be adorable in spray-painted turquoise frames. You could probably find any random, mix-match frames at a thrift store and spray them all the same color. Buy some inexpensive matting, or make your own out of cardboard and you'll have an exquisite, one-of-a-kind, custom gift. Here are a few of my favorites below printed on a page from a vintage, French dictionary. Aren't they great? I think these would also make a fabulous baby shower gift for someone's nursery.


Friday, November 22, 2013

Simple DIY Holiday Gift Ideas: Day 1

Now that the holidays are coming full steam ahead I figured I'd share some simple DIY gift ideas that I've either done in the past or will be attempting this holiday season. Our budget's always really tight right around the Thanksgiving season. My husband's a landscaper and he does snow removal for the winter, so all our costs are up front, and as you know, snow's pretty unpredictable this time of year. Since I can't control the weather, I've taken it upon myself to get creative and budget friendly with gifts.
I'm actually not super crafty, or that creative- I just duplicate things I see based on whether or not I think it's easy enough to attempt. So trust me when I say these are pretty easy, and you don't have to be a super-duper crafter to do these.
Idea uno: Lamp Shade Turned Laundry Basket/Toy Bin
This might actually be a cute thing to give a kid filled with toys, instead of spending money on the wrapping paper or a gift bag.


Step 1: Find an over sized lamp shade. 
I bought this bad boy for $6 at an auction, but thrift stores are packed with retro lamp shades. Make sure you find one big enough and sturdy enough to hold clothes or toys. I really liked how this shade already looked like a basket with the woven wicker and raffia. 

Step 2: Sew a basic pillow case for the insert. 
Next I took fabric from a left over shower curtain (I use curtains for all kinds of reupholstery projects- they're fun and relatively inexpensive). Note: I am not a sewer. This was actually only my second attempt at a sewing machine. To prove it, I'll show you a close up of my lines. 
Not the straightest lines ever, but honestly it doesn't matter because it's hidden. I used the already-sewn hem line of the curtain as the top of my bag so it's a nice, pretty hem when folded over the basket. 
I measured the width of the shade then added a few inches to the width of my bag so it had some room to give and fold when toys or clothes were thrown in. 
Step 3: Insert bag into upside down shade and enjoy!
I tucked mine under a desk in our hallway right outside the bathroom where clothes naturally seem to pile up. When it's laundry time, I just take the bag out and carry it down to the laundry room. If I were good at sewing, maybe I'd add some fancy handles. But this is simple DIY, no handles necessary. 


  More thrifty, but fun ideas on the way...


Monday, November 18, 2013

Real Estate Monday: Seattle

Yes, Seattle's a long ways away from Pittsburgh, but let me explain the worm hole that led me to this gem! As I was googling images for kitchen door curtain inspiration, I came across this girl's blog: The Modern Cottage. Scrolling through on my iphone I was really intrigued. She's like my twin on the opposite side of the states- at least I'm going to allow myself the honor of this title, she's where I'd love to be in say, seven years from now- similar back stories to opening a store and repainting furniture, etc. And as I glanced through more of her blog, I saw she does real estate posts, too! I was so excited by this house she posted and by finding this gem of a blog that I just had to share it with you today (even though it is on the other side of the country). I think you'll love it, too!
2406 2nd Ave. W, Seattle, WA 98119
  
Ever since owning my own Craftsman style house, I'm kind of obsessed with them. 

This looks like a magazine, doesn't it? 

This could be a Pittsburgh house, really. Just paint those panels white, slap some calm, flat grey paint above, and echo that monochromatic color scheme by painting your antique table in a high gloss grey. 

This is literally the same.exact.floorplan as my house, but it (obviously) looks 100% different. It's got my mind going a bajillion miles a minute. It looks professionally designed, but I don't think it's anything too lofty or inaccessible as far as mimicking this look. I love the cool colors, the different textures from the fabrics and rug, and the pop of color in that turquoise velvet chair. 

What a neat den. Those cherry-red hounds-tooth chairs are AWESOME. And did you notice the books on the shelf are color-coordinated? 

Marble counter tops, brass pulls, glass doors, and a farm sink. My dream kitchen. 

Again, is this a magazine, or a real house? I'm not so sure.

Look at that painted dresser! 

That console to the left is a typical Mediterranean style cabinet that Pittsburgh seems to have a million of. You might not recognize it with that high gloss white paint (usually it's dated, dark fruit wood), but that just goes to show what a little paint can do to add some glam. The headboard is a mirror- I'll have to remember that one. 

What a fun rug!
There you have it. What do you think? Thanks for the inspiration, MCC.