Thursday, January 30, 2014

Making My Own Chalk Paint

I shipped my three year old off for a sleepover at Pepaw's and finally got to tackle a project I've been dying to do- DIY chalk paint (not to be confused with chalkboard paint, mind you). Chalk paint has been pretty trendy in the up-cycling furniture world for a while now, but with expensive brands, like Annie Sloan, I've yet to try it.
It all started when I popped in an adorable, re-used furniture store in Sewickley, called Ideas, before Christmas. The owner was so sweet and gave me a sample of the brand she carries in her store. It's called Maison Blanche and it's an entire line of paint/waxes. I chose a bright green and I finally got around to painting a little stool from my bedroom. Chalk paint boasts of being easy with little-to-no prep work involved. Just paint and wax and you're supposedly done. It probably took me about four coats till I had complete coverage. Had I been going for the farm/distressed look I could have knocked it out in one coat, but I wanted a solid look. Here's the process:
Observe ugly stool. 

First coat (I always use a fairly dry brush when applying my first coat).

Second coat. 
 Third
 And finally a forth coat and some new fabric. 
Now if I only I knew where I put my staple gun. 

I really enjoyed not having to sand or prime my stool, and I even tested its durability by scratching my nail across it (barely scratched if you must know). My only hang up is the price. Now it's not so bad if you're only doing a small stool to pay $10 a jar. I even have half a jar left! But if you're going for a whole dresser and want it completely painted, not just the distressed look, that's going to put a hole in your pocket. So I did some digging and found out it's really quite easy and affordable to make your own paint!
There are multiple ways of doing it, but I chose to buy some calcium carbonate powder from a drug store online. It cost me all of $3.85 with free shipping. Deal.
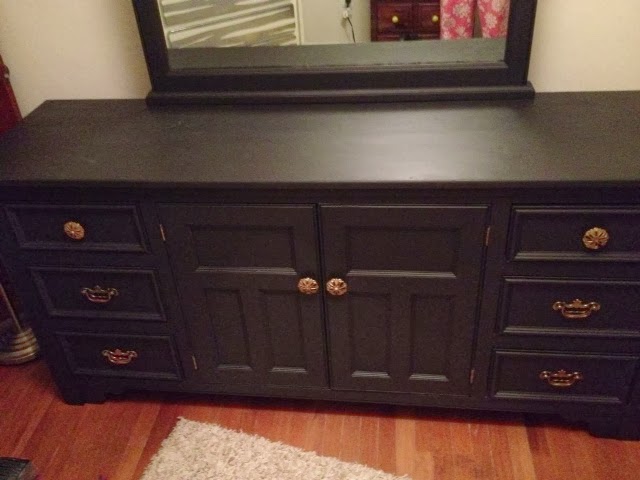
 I had a request to do this dresser in a black-matted paint which was perfect for this type of project.
 Even though you're not supposed to have to sand, I still used a Brillo-wool pad and lightly went over my dresser top to bottom. I did this all in our spare bedroom just making sure to vacuum and dust afterwards. Next, I pour some of my black latex paint (it happened to be an eggshell finish) into a spare can about a fourth of the way. Then I poured about a third of a cup of the calcium carbonate powder in and stirred it really well. I've read different measurements like 1/3 powder to 2/3 paint if that helps you. I'm not a measurer, hence I'm a horrible baker. But it's never been a problem with painting. I just feel for a thicker consistency when stirring, and make sure you stir well, otherwise you'll get little, white beads of powder when you're painting. I dry-brushed my first coat on making sure it was pretty thin. When dry-brushing the key is to only dip about a millimeter of your brush into the paint. Time efficient, no, but it dries quick and allows for a really nice, even second coat. I haven't tried a roller with this paint yet, and I almost feel like it's too thick to try. You really don't see the brush strokes with the chalk paint, so I kind of like using the brush. I did about three coats with this batch of paint I made and still had some left over. I've yet to wax it, but I'll get to that in another day or so. All in all, I'm more than thrilled with the result. I feel like I accomplished the same effect for half the price. That gets a check in my book any day. 

 The finished product. Doesn't even look like the same dresser, does it? 


Thursday, January 23, 2014

Home Swap for the Design Enthusiasts

This is one of those "why didn't I think of that?" ideas. Especially after that movie The Holiday came out where the characters (Jude Law, anyone?) swapped homes and magically fell in love, and had some life-changing experience. But seriously, here's a new business, called Behomm, that's by invitation only where designers and artists can vacation in each others' place for free. How fun would that be? Maybe I can create a similar business model for the moderately talented DIY-ers/design enthusiasts (read: designer wannabees), like myself. That way we can vacation for free somewhere semi-cool in a like-minded environment. Preferably anywhere that's above 10 degrees. Rant over. Here's the link from domainehome and some pictures I took the liberty of sharing from said website just in case you needn't be bothered with links.
Speaking of being bothered, anyone else receiving phone calls from Duquesne light and being lured into a 15 minute survey? I finally stopped the poor girl after 10 minutes and asked if we could be done. I feel so rude, but really Duquesne- FIFTEEN MINUTES? There has to be a better way of serving your customers.
Now I'm really done. Here are the pictures of the house I'll choose to stay at. Oh, Spain! I don't speak your language, but you somehow speak mine...


Tuesday, January 21, 2014

Turning a Dresser into a TV Console


We've all seen it done before- dressers used for tv consoles. They just happen to be perfect for flat screen TVs. I just happen to be a little late in the game. Our previous stand did the trick, but I didn't love it (plus, it didn't really solve our storage problems). Since we no longer needed our dressers in the bedroom, I had this small one that was perfect for the space and really addressed our much needed toy corralling problem. 
Back when I was using it in my bedroom, I dry-brushed it with a white latex paint and threw on some new, wooden knobs. When I brought it downstairs, I took out two of the top drawers to house our cable, blue ray, and sound bar box. I contemplated taking out the third drawer for symmetry, but I left it in to hide our dvd collection. 

I took a drill and a hole saw drill bit (very handy thing to invest in if you don't already have one). All I did was eye up where I wanted my holes to go in the back for all the cables to be thread through and drilled. It's super easy when you have this drill bit and it takes like two seconds. The outcome is a perfect circle for all your cords to fit through, otherwise you'd have cords coming out the front all over the place.
via
Observe the back side:

And the best part: lots of storage for toys!

Here's an old picture of our previous (Ikea) console- practical, yes, but also quite boring. And what is it about dark wood and dust? I swear. I had to dust that baby EVERY.SINGLE.DAY. I'm all for the "if I don't see it, it doesn't exist" motto.

Not only does our "new" console hide the dust, it somehow transformed our space into something so much warmer! I'm pretty pleased. 


Friday, January 17, 2014

Overcoming Awkward Room Shapes

The playroom. This room haunts me. It has a bathroom and a closet, so technically it's a bedroom room, but it's so awkward that I've always had trouble styling it. Plus, it's tiled so it's just super-cold all.the.time. Well, I think I've finally found the solution- cutting the room in half. Here are two before pictures each of opposite sides. They don't even look like the same room, I know, it truly is that weird of a room.
 
Here's a pic of the whole room from way back when it used to be partially my husband's dressing room, and way too green! The chimney juts out, and the sliding glass doors make it so we can't place any furniture that might block the exit. (With the addition of our new wardrobes, I'll be selling the antique lowboy dresser in this picture, email if you'd like to see more pics before I paint it).


So here's what I did that I'm finally happy with- we used T's crib from her old room, took off the front rail, and are temporarily using it as a "day bed" to split up the room into two halves. Eventually, we'd like to get a small pullout love seat, but that costs money and they're hard to come by used.

 I now have a tiny little office space when needed, and T has a cozy spot to watch her movies.
 Recognize a few things? The desk used to look like this before I painted it white:
And the lucite chair:


And here's her little play nook: A mess of toys stuffed into boxes, and barely any floor space to play, but let's be real, those toys end up getting transferred to our living room so I might as well have a place to throw them out of sight in the mean time. 

And just in case you wanted to see T's new, old bedroom (the tiniest room ever), we switched her full-sized bed to the nook where the crib used to be, and I've never slept in a more cozy space. Seriously. I'm out like a light every time I lay her down at night. All while she's piling animals on top of my face. There's just something about beds in nooks. That and small rooms- they're so much warmer. 

Before


Also, we used the front rail from the crib to keep her from rolling into the radiator and/or off the other side of the bed. 
My husband had the best idea of painting a headboard on the back wall. I think we'll do that next. 

p.s. here is a great post with tips on how to live in a small space- a 240 sq. ft apartment. After reading this, I went straight to the author's blog and found it extremely amusing, even catching myself laughing out loud at times. I'll be adding hers to my daily reading list for sure. 

Wednesday, January 8, 2014

Master Bedroom Color Palette

If you read my last post, you'll know I'm finally redoing our master bedroom. I've honestly put very little effort into styling this room in the past (as evidence by my picture below). I mean, it looks fine, but it's really uninspiring. I've always been into mismatched furniture, but let's be real, there's no cohesiveness to this look. 
So without further adieu, here's the new color scheme. I'm going for a dramatic, bohemian look. Lots of color, but it'll be in pops of accents throughout the room. The main wall color will be Peacock Tail in an ultra flat paint. The color in this picture looks a little lighter than it does in person. We'll see how that translates on the wall. I hope I like it.
I'm also thinking of using this Cherry Jubilee color in a high gloss on my nightstands, but that will have to wait to see how the wall color turns out. Either way, both the seafoam and cherry colors run throughout two of the quilts we normally use on our bed. Paint goes up tomorrow. More to come...

Tuesday, January 7, 2014

Ikea PAX Wardrobes: Expanding Our Closets Part 1

Happy New Years everyone! I've been sort of quiet lately in the blog realm, but quietness definitely does not equal laziness. If you're a reader of this blog you might remember we put an offer on an old fixer-upper in homestead and put our house on the market. Well, since then we had a lifesaver-of-a-home-inspector come in and reveal some not-so-nice things about the house we were going to buy. I was bummed, but mostly grateful that we found out some major issues with the house before we bought it. I'm fine with major renovations- we expected that. What we did not expect was extensive termite damage that basically deemed the basement stairs all the way up to the main stairs unsafe, water damage that had made its way to the entire second floor (it's a three story home), and structural issues that would take a lot of money to fix. All things we would never have seen without the trained eye of a professional. I feel bad for the homeowners, but since the house has been unoccupied for many years, it's to be expected to find a lot of unknown issues.
Anyways, with that said we left our home on the market for three months to see if we'd get any offers. Around Christmas, it got way too busy to have showings and since we no longer had a house to move into, we pulled ours off the market.
At first, I was discouraged by the feedback of our home. It was mostly good, but people didn't like the noise from the traffic, something we can do nothing about (also something that doesn't really bother us). The house itself is great, and we've decided to give it some time. I've basically come full circle from wishing we could move to loving the potential my home has to offer. I think it's a good place to be- to be content and thankful for what you have.
Ok, now to the good part. With the decision to stay, we're doing some minor renovations to better fit our needs. Number one on the list: CLOSET SPACE.
Pittsburgh homes have these wee little closets. I saw this inspiration photo on another blog and thought our room would be a perfect place to try.


They're simply three Pax wardrobe's from IKEA, painted and trimmed with molding to make them look like one unit. My husband was an easy sell because his clothes would finally all be in one spot. First I looked on craigslist and found two wardrobes for sale for half the price. Score. Then once we got them home we realized they weren't the right depth that the guy said they were. Bummer. We still used one for the center piece though, and it at least save us $50.
Now these wardrobes are not cheap, let me warn you. Particle board, yes. Cheaply made, yes. But inexpensive. Not really. I'm sure it's a cheaper solution to something like a California closet though, and you're able to customize it however you want. All in all, I think we spent about $400 not including doors (our room is too narrow for doors, so I think we'll leave those off). But honestly, I think that's cheaper than buying the equivalent of two large (used) dressers, which would provide less storage and take up more space. So here's what we have so far:
The long wall in our bedroom all cleared off and ready to go. 

First frame in the process of being built. Not terribly difficult, but definitely a two person job.
If you wanted to paint them, you'd probably want to do that first while they're in pieces.
I wanted them white.

First frame completed and moved into place.
Sorry for the bad pictures,everything's a mess, but it's a work in progress.
Time to add drawers. A much easier process, and I really like the quality of the hardware.
These things open and close smoothly, and they're super spacious.
Like fits-ten-piles-of-folded-t-shirts-spacious.

Setting up the boards for the middle frame.

Success. Built and in place. We anchored the three pieces together with a few bolts and nuts.
Again a two person job- one for pushing the frames together, while the other person screws the bolts in place.

Adding our clothes has been my favorite part. I left room in the center piece to act as a vanity.
I like how the center piece is recessed- I wasn't sure if our "mistake" in buying the wrong size would look bad or not. But it kind of looks like we meant to do it, and it allows a place for my stool without it sticking out in the middle of the room.

Next I wanted to paper the inside vanity area to set it apart.
I bought this contact paper hoping it would do the trick.

It's super fun looking, but I think installing this might be the death of me. 

After getting my first row on, I realized the pattern doesn't line up for the next row.
I'm now contemplating ripping it off, and just painting it a contrasting color. 
Overall, this has been an extremely exciting process. It wasn't at all easy like I thought it was going to be, but I like the way it's coming together. My next step- adding trim to make them look like one unit and repainting my room. I'm thinking something dramatic and moody, maybe something in the indigo family with gold and seafoam green accents.
Click here for Part 2 and finally Part 3 of our remodel.