Thursday, May 5, 2016

Open House Sunday May 15th: Industrial Loft/Play Space

I have the privilege of listing a friend's place in McKees Rocks. If you know anyone looking for an awesome space to live, work and play, this is your ticket. It's zoned R-2 so realistically you could split into two units, rent one out and live in the other. BUT, as it is, it's a super-creative place that has a huge open living room (currently used as a recording space) and kitchen downstairs, then loft style living upstairs. There's an industrial, yet cozy feel to this house.
Come join me for an open house Sunday, May 15th from 11-2pm and see for yourself. 
208 Helen St.
McKees Rocks, Pa 15136


Friday, March 18, 2016

Easy/Stylish Pillow Craft (with the kiddos)

I was inspired by this article in HGtv Magazine where this blogger  painted ikea pillow covers to look like designer pillows. I'm not crafty, but I figured I could handle this and I happened to have some spare Ikea pillow case covers on hand. I think they're like $4 at ikea.
via
 Anyways, I whipped out some craft paint and started painting some dot like shapes. I didn't even have the fabric medium to add, and it turned out fine- a little rough, but fine. 
Taliila saw what I was doing, and found one of her pillows that she wanted to paint, too. 
Then Gus woke up from his nap, and of course had to have a go at the paint brush as well. Turned into a family affair. Here are the results:
From left to right, Gus's rad pillow and Taliila's pillow says "kindness". 
Taliila used q-tips for her dots. I thought that was a good idea. 

The end result and my attempt at the dots that turned out more like animal tracks. 


I love the idea of temporarily covering my pillows with a fresh new look. Especially with my kids artwork. 

Monday, March 14, 2016

Get Inspired: Big Chill Color Challenge

I've got kitchen renovations on the brain, so naturally when Big Chill invited me to do an inspiration board using the Pantone colors of 2016 as inspiration, I got a little giddy. I've been eyeing these stoves for a while and the pink lemonade color has always been one of my favorites.
Before testing out my own style board, I always thought these stoves were typecast to a strictly retro-cottage theme. As you can see here, both inspiration boards have a more modern, chic feel to them. While I love myself a good beach house as much as the next person, I'm really digging the incorporation of the colorful pink stove with the sophistication of all the classic black and white.  It's very much what I'm trying to accomplish in my own kitchen...sort of a French inspired grotto with a touch of pizzazz. 
This next one is really my favorite and jives more with using both the pink and the blue colors together. I love pulling in hues of pink with fabrics, and I can just picture a vase full of peonies on those soapstone counters. I'm also a huge fan of mixing metals. I convinced myself of this a while ago, but here it just shows how you can totally get away with it. Matchy, matchy out. Mixing in. 
And one more thing I learned from my mom- lamps are a must on the countertop. It adds a certain warmth that I just can't explain. Trust me. 

 Left to Right: Pendant: Tile: Soapstone Counters: Chair: Big Chill Stove in Beach Blue: Cabinet: Hardware: Pillow: Rug: Lamp


Thursday, March 10, 2016

Renovations Week 5,6,7...


We're finishing up on some major renovations in our new house. We actually had a contractor come in and remove a wall in between the living room and kitchen- a job too big for us to handle on our own since it involved moving duct work and electrical. He also redid the entire bathroom for us.
My husband and I were talking the other night about it and realized we both never intended to fully gut the bathroom. Like so many renovation stories you hear, one thing lead to another and before we knew it, we were down to the bare studs. There was such bad mold and water damage under the tile, we really had no choice once we saw it. The good news is it's done, and we didn't have to do the work! Yay!
Bathroom Before Gut Job
Bathroom During Gut Job
Bathroom Completely Ripped Out, Re-plumbed, New Window Installed

My original pick for the floor didn't match AT ALL once I laid it next to the shower tile. 
I was so bummed because the tiles I picked totally looked right together in the store, but once I got them in my bathroom under my lighting (and not in the big store), they clashed. Both of them have that marble look, and it was just way too busy. Thankfully I caught it before they were cemented to the floor, ran to Lowes that night, and lugged 100 lbs of new tile back up to the bathroom. 
Floor tile from Lowes, shower tile from Home Depot

Need to add a coat of paint and hang my mirror.
Light from Lowes.


The vanity was an old cabinet I had already, and I ordered the sink and faucet from overstock. 

Living Room Before Picture: see that tiny entry way into the kitchen? 

Living Room: Ripping up the flooring 


Ripping out the wall and framing the opening/reworking the duct work.


View from the kitchen into the living room
Add caption

Experimenting with some fun designs on the steps
Living Room with new floors and ultra white paint.

TrafficMaster Lakeshore Pecan Floors
I'm pretty pumped about these floors. Remember when I told you I picked the cheapest floor option Home Depot had? These were it, at only 79 cents/sq. ft! I was second guessing myself, but I really liked them regardless of the price. Laminate flooring has come a long way.
Back upstairs the hard wood floors are a little lacking in comparison. We tried sanding them with a belt sander to no avail. Not wanting the expense (or the backache) of lugging in a commercial floor sander (been there, done that), I decided to paint them. 
Floors before

Hallway Floors Before

First coat of floor paint.


Looks like it's gonna take a few more coats of floor paint before these look right. 


So there we have it... lots of loose ends to be buttoned up before we can move in, but we're getting there. I'm hoping my next post will be the finished product.


Sunday, February 7, 2016

Renovations Week 2: Get your paint on

Even though this should technically be the end of week three of renovating, we lost a week due to my parents visiting and snow- my husband does snow removal so he's gone most the day and night during a snowfall.
Also, my phone shattered about a month ago. I refuse to pay $165 to have it repaired just to have it be dropped and broken all over again. So these photos were taken with my dinosaur iphone. I'll have to bust out my "real" camera for some better quality pictures. But until then, here's what we've got. 
Bought this chandelier for $25 off craigs from this guy in Penn Hills that ironically enough I use to buy from for my store. It's now bright yellow and hanging against this green wall in our office.  I plan on putting little round bulbs in it. I'll share that next week. 


 I was going to leave the carpet in this room, except a little person wondered into this room today and had some paint on the bottom of her boots. Paint is a beast to get out of carpet, so out it goes. I plan on painting the floors an ultra white (gasp, I know I should refinish them, but there's so much paint on them from the previous owners and I'm feeling overwhelmed right about now).
Meanwhile, my husband has been working on exposing this awesome rock wall in the kitchen. It already felt like a cave, now it's official. We'll be replacing the door with an all-glass door soon to let some light flood in. 

I'm looking at these groutable, vinyl tiles for the kitchen, and I like this pecan floor for the living room. It just so happens to be a whopping 79 cents a sq. foot! I'm not sure I'm ready to go vinyl in the kitchen, but I honestly hate tiling big areas, not just out of laziness, but if one breaks, it's impossible to replace the section. This will be a rental for most the year, after all, so I'm trying to not break the budget here on something that someone else will be using ( and perhaps not be as good at taking care of). 


And if the Broncos win the superbowl, my husband owes me this chandelier from etsy. I think it'd look awesome in the kitchen over the island. 

you can find this here


Finally, the master bedroom was painted a stony grey. The window in this room is so big that I struggled to get a good picture of this room since the light was just flooding in. Maybe with a real camera I'll be able to capture a pic of the view of the Hot Metal Bridge and all the buildings of Oakland in the background. 

On the agenda for this next week: a contractor friend is coming in to put a beam up in the living room/kitchen so we can open that wall up and reroute the air ducts. He's also helping us re-dry wall the bathroom. 


Tuesday, January 19, 2016

Renovations Week 1: The Rip Out

So if you missed it, we bought a new, little project. I explained everything in this post here. This was probably the hardest closing I've had since becoming a Realtor (almost two years ago!). Annoying things kept getting in the way of closing on time, including the furnace breaking down not once, but two times! But alas, we closed last Monday and we've already began the process of ripping it apart. 
If you like progress, DIY blogs that are in the moment, then you've come to the right place. My goal is to have this be a livable space come March 1st, so we can put our current house on the market. We'll see how that goes. 
So far I:
 -ripped the carpet out of the living room, then had to rip up some suspect looking tiles. Please don't follow my lead on this. They were probably asbestos tiles given the age of the house, and general size and shape of the tile. I did not have them tested. Most of them came up easily, then we'll encase the floor with new flooring on top. 
Before
-Next I punched a hole in the wall to see if I could open up the wall between the dark kitchen and living room. There seems to be four heat vents running up this wall so we're having a contractor come in today to look at costs of rerouting these. Also, for those Fixer Upper fans out there, I swear the old wall under the dry wall looks like ship lap, so that's kind of fun. 

I also was a little hammer happy so I opened up a water-damaged wall in the kitchen, only to find an old, stone wall behind it (I'll get pictures of this next time). I was reading up on stone walls and I guess they need to "breathe". Don't we all. I'm thinking of leaving it exposed so as not to ruin yet another piece of dry wall, but it desperately needs re-mortared. 

The third floor got a new paint job. The whole house is painted in what I'll call "renters white"- which is pretty much what I've seen every rental painted. It's fine, but kind of dull and the room was dark so I thought I'd freshen it up a bit with some Ultra White paint. 
Before

See the difference ? 
During
Attic spaces are tricky because of the sloped ceilings. I read up on whether or not to paint the ceiling the same color as the wall, and most experts said yes. Since I chose white and not a color, I was pretty much stuck doing the ceiling anyways which wasn't too bad because it's relatively low. 
I know white's kind of a boring choice for me, but I really like how the light bounces off of the walls (it really made a difference) and I'll get to incorporate some colorful repainted furniture in this space.
After
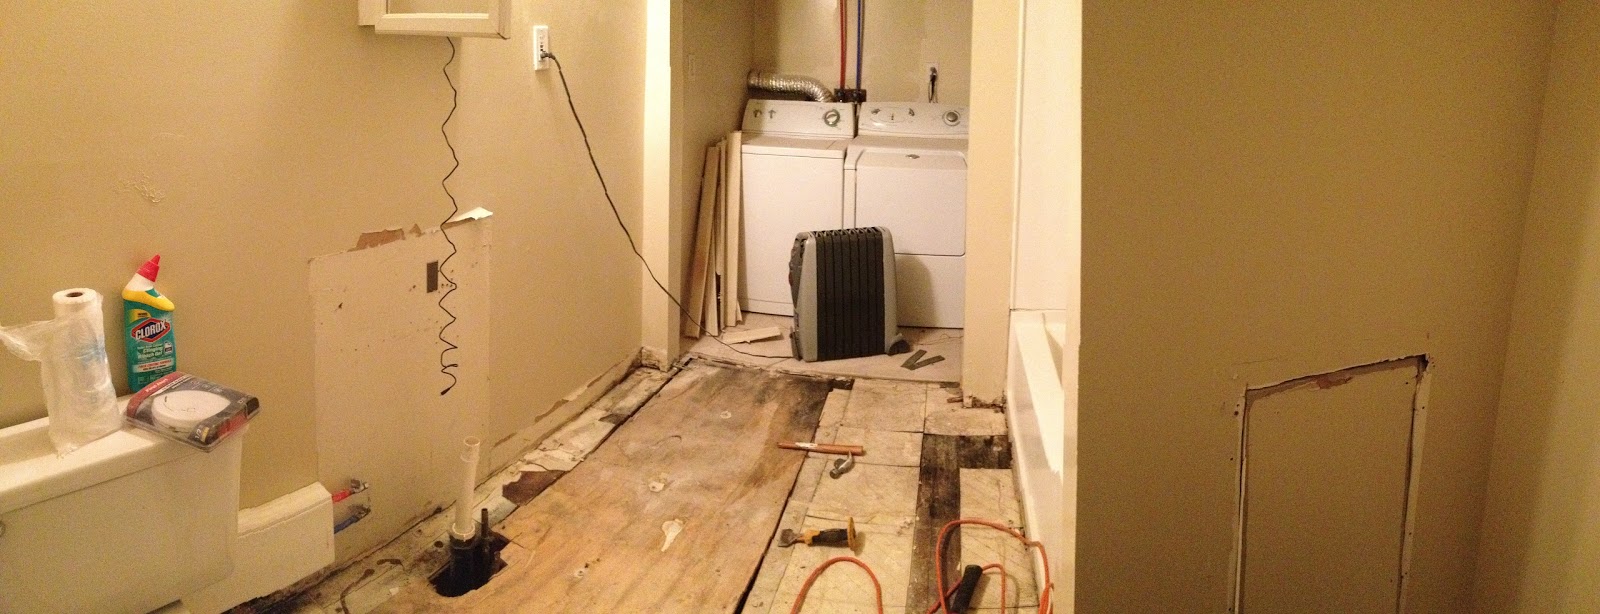
 While I've been working on those projects, my husband has been ripping out the flooring in the bathroom. I'm so glad he did this because we found some nasty black mold on the plywood underneath.
Before


Currently


This room is so scary to us because there's an open crawl space under the house where our pipes are exposed to the elements. They've already burst once and were replaced with PEX before we bought the place. We really need to use our noggins to figure out how to better insulate this bathroom before fixing it up. I'm thinking in-floor heating for toasty toes. 

Oh, we have our hands full, don't we? It's kind of fun to have a project in the middle of winter though. 
Next week's plan: Kitchen, stairs, hallway flooring, and lighting.